
A Databricks release is rarely just a notebook. Jobs, pipeline definitions, libraries, permissions, schedules, environment-specific values, and source files all have to move together. They also have to stay in sync across environments.
Declarative Automation Bundles bring that release definition into source control. You describe the Databricks resources in YAML, keep the related code in the same project, and use the Databricks CLI to validate, preview, deploy, and run it.
The name is new; the product is not. Databricks renamed Databricks Asset Bundles to Declarative Automation Bundles on March 16, 2026. You will still find DAB and DABs in older repositories, issue threads, and search results, but those abbreviations are now legacy terminology. The rename is non-breaking, so existing configuration and databricks bundle commands continue to work. Databricks covers the naming change in its bundle FAQ.
Do not confuse the rename with the direct deployment engine rollout. That engine became generally available in June 2026 and is the default for new bundles created with Databricks CLI 1.3.0 and above. Existing bundles can migrate separately; adopting the current product name does not force an engine migration. The timeline is recorded in the official bundle feature release notes.
What Are Declarative Automation Bundles?
Think of a bundle as the deployable definition of a Databricks project. Depending on the workload, it can include:
-
Lakeflow Jobs and their tasks
-
Lakeflow pipelines
-
notebooks, Python files, SQL files, and packaged libraries
-
AI/BI dashboards and other supported workspace resources
-
deployment targets such as development, staging, and production
-
variables, permissions, run identities, and workspace paths
A bundle does not replace Git or your CI/CD platform. Git keeps the history; GitHub Actions, Azure DevOps, GitLab CI, or another runner can trigger the release. The bundle handles the Databricks-specific definition and deployment lifecycle within that process.
Nor is it a release safety net on its own. You still need tests, approvals, monitoring, and a controlled way to redeploy an earlier Git revision. What the bundle gives you is a reviewable, repeatable deployment unit.
Why Use Bundles Instead of Manual Deployment?
The value becomes obvious once a workload has more than one environment or more than one person maintaining it.
Repeatable deployments
One project definition can be validated and deployed to multiple targets. Values that differ by environment live in target overrides, rather than in a checklist of manual edits before each release.
Version-controlled configuration
Resource definitions and source files travel through the same pull request. A new job schedule, pipeline setting, or notebook path is reviewed beside the code it affects.
Clear separation between environments
Development and production can use different workspaces, catalogs, schemas, identities, and compute settings without splitting the project into separate copies.
Databricks also provides optional development and production modes with environment-specific defaults and validation. The details are in the current deployment modes documentation.
A consistent CI/CD interface
Engineers and CI runners use the same core workflow: validate the configuration, inspect the plan, deploy the resources, and run the required job or pipeline.
Legacy Examples vs. Current Bundle Syntax
Older tutorials can be misleading here because several names and schema patterns have changed. This is the short translation table:
| Legacy example | Current approach |
|---|---|
| Databricks Asset Bundles, DAB, or DABs | Declarative Automation Bundles, or simply bundles |
| dab.yaml | Exactly one root configuration file named databricks.yml |
| resources.workflows | resources.jobs |
| A top-level resources.notebooks list | Reference notebooks or source files from job tasks or pipeline libraries |
| Jobs and pipelines expressed as anonymous lists | Keyed mappings such as jobs.customer_metrics |
| databricks bundle run –job my_job | databricks bundle run my_job |
| Delta Live Tables or DLT | Lakeflow pipelines |
| import dlt in new Python pipeline code | from pyspark import pipelines as dp |
| Pipeline target field | Prefer schema; target is now a deprecated legacy field for pipeline creation |
The current YAML schema is documented in the official bundle configuration reference and resource reference.
A Minimal Bundle Project
A small project can use the following structure:
customer_analytics/
├── databricks.yml
├── resources/
│   └── customer_job.yml
└── src/
    └── customer_metrics.py
At the root, Databricks expects exactly one databricks.yml file. Use include to split resource definitions into smaller YAML files. Paths inside an included file are resolved relative to that file, which is easy to miss when reorganizing a project.
1. Install the CLI and authenticate
Use a current stable Databricks CLI release. The basic bundle workflow requires CLI 0.218.0 or above, but newer features need later versions. In CI, pin a recent version you have tested instead of treating the minimum as a good default.
databricks -v
databricks auth login --host https://<your-workspace-url>
For local development, the recommended choice is OAuth user-to-machine authentication. Unattended CI/CD should use OAuth machine-to-machine authentication with a service principal.
Keep credentials and client secrets in the CI/CD secret store or environment rather than in the bundle YAML. The supported options are documented under authentication for Declarative Automation Bundles.
You can start from a Databricks template:
databricks bundle init default-minimal
Choose default-python if you want a generated Python project with a job and an ETL pipeline. The current template requires uv.
2. Create databricks.yml
bundle:
  name: customer_analytics

include:
  - resources/*.yml

variables:
  catalog:
    description: Unity Catalog catalog for this project
    default: main
  schema:
    description: Schema used by the deployed workload
    default: customer_analytics_dev
  cluster_id:
    description: Existing cluster used by the sample notebook task

targets:
  dev:
    mode: development
    default: true
    workspace:
      host: https://dbc-dev-example.cloud.databricks.com
    variables:
      schema: customer_analytics_${workspace.current_user.short_name}
      cluster_id: <development-cluster-id>

  prod:
    mode: production
    workspace:
      host: https://dbc-prod-example.cloud.databricks.com
    git:
      branch: main
    variables:
      schema: customer_analytics_prod
      cluster_id: <production-cluster-id>
    run_as:
      service_principal_name: <service-principal-application-id>
Replace the hosts and service principal application ID with your own values. For a production target, define the required permissions as well and confirm that the deployment identity can manage every declared resource.
In development mode, Databricks creates a personal development copy, adds a prefix and tag to supported resources, marks Lakeflow pipelines as development pipelines, and pauses schedules and triggers by default.
production mode applies stricter validation for controlled releases.
3. Define a Lakeflow Job
Create resources/customer_job.yml:
resources:
  jobs:
    customer_metrics:
      name: customer-metrics
      queue:
        enabled: true
      tasks:
        - task_key: calculate_metrics
          existing_cluster_id: ${var.cluster_id}
          notebook_task:
            notebook_path: ../src/customer_metrics.py
Here, customer_metrics is the resource key used by bundle commands. name controls what users see in the workspace.
This sample resolves a different existing cluster ID for each target instead of hard-coding a cloud-specific node type or Databricks Runtime version.
In production, choose serverless compute, a job cluster, or an existing cluster based on the workload and your platform rules. The available fields are listed in the current job resource schema.
4. Add the Python source
Create src/customer_metrics.py:
# Databricks notebook source
from pyspark.sql import functions as F

result = (
    spark.range(1)
    .select(
        F.current_timestamp().alias("processed_at"),
        F.expr("current_user()").alias("processed_by"),
    )
)

display(result)
The code does almost nothing by design: it lets you test the deployment path without depending on a particular table. Once that works, replace it with the real transformation and tests.
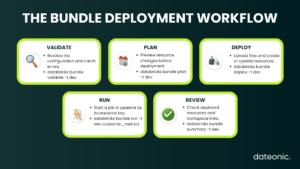
5. Validate, plan, deploy, and run
Run these commands from the bundle root:
databricks bundle validate -t dev
databricks bundle plan -t dev
databricks bundle deploy -t dev
databricks bundle run -t dev customer_metrics
databricks bundle summary -t dev
The sequence is worth keeping intact. validate checks the resolved configuration, and plan shows the proposed resource changes without applying them. deploy uploads the files and creates or updates the resources.
Then run accepts the resource key directly. There is no --job flag in the current syntax. Finally, summary returns the bundle identity, deployed resources, and workspace links. See the official bundle command group reference for the current flags.
Adding a Lakeflow Pipeline
Delta Live Tables is now Lakeflow pipelines. Existing DLT code continues to work, so the rename alone is not a reason to rewrite a working pipeline.
New code and documentation, however, should use the Lakeflow name and the Spark Declarative Pipelines API. Databricks explains the transition in What happened to Delta Live Tables.
For example, a serverless pipeline resource now looks like this:
resources:
  pipelines:
    customer_pipeline:
      name: customer-pipeline
      catalog: ${var.catalog}
      schema: ${var.schema}
      serverless: true
      libraries:
        - glob:
            include: ../src/pipeline/**
The corresponding Python file under src/pipeline/ can use the current pyspark.pipelines API:
from pyspark import pipelines as dp


@dp.materialized_view()
def deployment_check():
    return spark.range(1).selectExpr(
        "current_timestamp() AS refreshed_at"
    )
Use @dp.materialized_view for a batch query that produces a materialized view. For a streaming query, use @dp.table with a streaming DataFrame. Both patterns are covered in the official Lakeflow pipeline Python development guide.
Bringing Existing Resources Under Bundle Management
You do not have to rebuild an existing project from scratch. The CLI can generate YAML for a supported workspace resource and bind that definition back to the original object. For jobs with notebook tasks, for example:
databricks bundle generate job \
  --existing-job-id <job-id> \
  --bind
Pay attention to --bind. If you generate the configuration without binding it, a later deployment may create a second resource rather than update the original.
Review both the generated YAML and downloaded source files before the first deployment. Databricks describes the full process in migrating existing resources to a bundle.
Bundle CI/CD Best Practices
A bundle gives the release process structure, but production controls still sit around it. A practical baseline is:
-
Pin a tested Databricks CLI version in CI.
-
Run unit tests and
databricks bundle validateon pull requests. -
Review
databricks bundle planbefore production deployment. -
Keep development and production targets isolated.
-
Use OAuth M2M and a service principal for unattended deployments.
-
Keep secrets outside
databricks.yml. -
Restrict write access to the production deployment path; do not use a broadly writable
/Sharedpath. -
Run integration checks after deployment and map every release to a Git commit.
-
Use
bundle generate ... --bindwhen adopting an existing resource. -
Treat
databricks bundle destroyas destructive: it permanently deletes resources previously deployed by the bundle.
That list will not eliminate deployment risk. It will make changes easier to review, test, trace, and reproduce when something goes wrong.
Where to Start
If your current setup still uses older examples, start with the vocabulary and schema.
Replace DABs with Declarative Automation Bundles in new documentation, keep the root configuration in databricks.yml, define workflows under resources.jobs, call bundle run with a resource key, and use current Lakeflow pipeline names and APIs.
Then put one job or pipeline through the entire development lifecycle before expanding the bundle. That first small deployment tends to expose the real decisions: workspace layout, identities, permissions, compute, testing, and release ownership.
If you want help designing those pieces, see Dateonic’s Databricks consulting services.