
This is the no-fluff, technical guide you’ve been searching for to set up Databricks in AWS. While many tutorials and first-party examples seem to default to Azure, this walkthrough is built for data teams who live and breathe Amazon Web Services.
We’ll skip the high-level marketing and get straight to the practical, step-by-step process. This guide covers deploying the CloudFormation stack, correctly configuring IAM roles for security, setting up the VPC networking, and launching your first cluster to query data right from S3.
This AWS-specific guide complements our general Databricks implementation strategic guide and shows you how to build a scalable, governed Databricks Lakehouse with the true multi-cloud flexibility you need.
Prerequisites for Setting Up Databricks on AWS
Before you begin the main setup, a little preparation is required. Ensure you have all the necessary components ready to guarantee a smooth deployment.
You’ll need:
- An active AWS account with administrative access.
- A plan for which AWS region you will deploy to.
- An understanding of potential costs, which you can estimate using the AWS Cost Explorer.
Here is a quick checklist of the prerequisites:
| Item | Description | Why Needed |
|---|---|---|
| Active AWS Account | A standard AWS account with billing enabled. | This is where all resources (VPC, S3, EC2) will be provisioned. |
| Databricks Account | A Databricks on AWS account (a trial or paid plan). | This is your control plane for managing workspaces and clusters. |
| IAM Admin Access | An AWS user or role with AdministratorAccess (or sufficient permissions). | Required to create the necessary IAM roles, policies, and CloudFormation stacks. |
| AWS Region Choice | A specific AWS region (e.g., us-east-1). | Databricks workspace is region-specific. Choose based on data locality and latency. |
Step 1: Signing Up for a Databricks Account on AWS
First, you need to register with Databricks and link it to your AWS provider. This initial step creates the Databricks „control plane” that will manage your workspaces.
- Navigate to the Databricks „Try Databricks” page.
- Fill out the registration form. Crucially, when prompted to select a cloud provider, choose „Amazon Web Services (AWS)”.
- You can opt for the 14-day free trial, which gives you full access to the platform to test its capabilities.
- You will receive a verification email. Click the link to set your password and log in to your new Databricks account console for the first time.
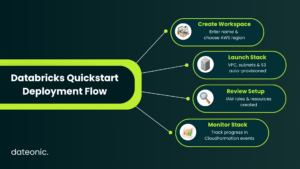
Step 2: Deploying Your Databricks Workspace Using AWS Quickstart
This is the core provisioning step. Databricks simplifies the process to set up Databricks in AWS by using an AWS CloudFormation Quickstart. This template automates the creation of your workspace and the underlying network infrastructure (the „data plane”) within your AWS account.
- Log into your Databricks account console (the one you just created).
- Navigate to the Workspaces tab and click „Create Workspace.”
- Select the „Quickstart” option. This is the recommended path for most new users.
- You will be prompted to enter a Workspace name and select your desired AWS region.
You’ll then be redirected to the AWS Console to launch the Databricks AWS Quickstart CloudFormation stack. This stack will automatically create a new VPC, public and private subnets, security groups, and an S3 bucket for your root storage.
Review the parameters in the CloudFormation console (most defaults are fine), acknowledge that IAM resources will be created, and click „Create stack”. You can monitor the deployment’s progress in the „Events” tab. It typically takes 10-15 minutes to complete.
Step 3: Configuring Networking and Security in AWS
While the Quickstart handles the basics, understanding and fine-tuning your network and security is vital for production workloads. The CloudFormation stack creates a dedicated VPC with private subnets for your clusters, ensuring they are not exposed to the public internet.
Key components to review include:
- VPC and Subnets: A secure Virtual Private Cloud (VPC) is created to isolate your Databricks environment.
- NAT Gateway: A NAT Gateway is provisioned to allow clusters in private subnets to access the internet for package installation without being directly accessible.
- Security Groups: These act as virtual firewalls. Ensure they are configured to allow necessary traffic (like HTTPS 443) while restricting all other access.
For enhanced security, always enable encryption. Databricks encrypts data at rest in your S3 root bucket (your DBFS) and manages in-transit encryption. This secure setup is fundamental to any good data strategy.
Step 4: Setting Up IAM Roles and Access Controls
Security is paramount. Your Databricks clusters need permission to read and write data from AWS services, primarily S3. This is managed through IAM roles. The CloudFormation template creates a cross-account IAM role that Databricks assumes to create resources in your AWS account.
For granular control, you should:
- Create specific IAM roles for your clusters with limited policies.
- Follow the principle of least privilege: only grant access to the specific S3 buckets your jobs need.
- Integrate these roles with your Databricks workspace using instance profiles.
Properly managing these permissions is a core part of data governance, which can be further enhanced using tools like Databricks Unity Catalog.
Step 5: Creating Your First Cluster in Databricks on AWS
With your workspace deployed, you can now create a compute cluster. This is the set of EC2 instances that will run your data processing jobs and notebooks.
- Log in to your new Databricks workspace (you’ll have a URL like my-workspace.databricks.com).
- In the left-hand navigation pane, click Compute.
- Click Create Cluster.
- Give your cluster a name.
- Select a Databricks Runtime version (e.g., the latest version with Scala and Spark).
- Choose your worker and driver instance types (e.g., m5d.large is a good general-purpose starting point).
- Enable autoscaling to allow the cluster to dynamically add or remove workers based on load.
Click Create Cluster. It will take a few minutes to provision the EC2 instances and start. A green circle will appear next to the cluster name when it’s ready.
Step 6: Running a Sample Notebook and Testing Setup
The final step is to validate that everything works. The best way is to create a notebook, read data from S3, and perform a simple query.
- In the workspace, click Create > Notebook.
- Give it a name, select Python as the default language, and attach it to the cluster you just created.
- To test S3 access, you can mount an S3 bucket or use a direct query to an S3 path that your cluster’s IAM role has access to.
Running a simple query on a sample dataset and seeing the results confirms that your compute cluster is running and your IAM permissions for S3 access are correctly configured. This setup forms the foundation for building powerful data pipelines with technologies like Delta Lake.
Common Troubleshooting Tips for Databricks AWS Setup
Occasionally, you may encounter issues during the setup.
- CloudFormation Failures: Check the „Events” tab in the CloudFormation stack for specific error messages. This is often due to missing IAM permissions for the user launching the stack.
- IAM Permission Errors: If your cluster can’t access S3, double-check the attached policies on your cluster’s IAM role (instance profile).
- Network Connectivity: If clusters fail to start, it could be a subnet or security group issue preventing communication with the control plane.
For more detailed issues, refer to the official Databricks on AWS documentation.
Conclusion
You have successfully provisioned a secure, scalable Databricks workspace on AWS. By following these steps, you’ve deployed the necessary networking, configured security, and launched your first compute cluster. You are now ready to leverage the full power of the Databricks Lakehouse Platform integrated natively with AWS services.
As an official Databricks partner, Dateonic can help you optimize your AWS setup, implement robust data governance with Unity Catalog, and accelerate your data strategy.
Contact us to learn how our expert consulting can get you to production faster.