
This guide is based on the official Dateonic Databricks YouTube tutorial series: Databricks Asset Bundles – Hands-On Tutorial. Part 4 – running multiple jobs from one main workflow I highly recommend watching this video as a complement to this guide for a visual walkthrough of the concepts covered here.
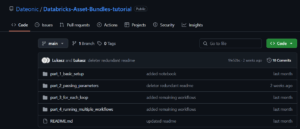
Check out our GitHub repository for this series of tutorials: https://github.com/Dateonic/Databricks-Asset-Bundles-tutorial
In this fourth and final part, I’ll take your knowledge to the next level by learning how to orchestrate multiple jobs within a single workflow.
This is part 4 of a 4-part series on Databricks Asset Bundles:
- How to Run Python and SQL Files with All-Purpose Compute (completed)
- How to pass local and global parameters in DABs (completed)
- How to do a for_each loop in DABs (completed)
- How to run multiple jobs in one main workflow (this guide)
Prerequisites
Before proceeding, ensure you:
- Have completed the previous parts of this series or have a basic understanding of DABs
- Have the Databricks CLI installed and configured
- Have access to a Databricks workspace
- Have basic knowledge of YAML configuration files
Project Structure
For this guide, we’ll create a workflow that runs two separate jobs in sequence. Here’s the structure of our project:
bundle_tutorial/
├── databricks.yml # Main bundle configuration
├── resources/
│ ├── first_job.yml # First job definition
│ ├── second_job.yml # Second job definition
│ └── workflow.yml # Main workflow that runs both jobs
└── src/
├── first_task.sql # SQL notebook for first job
└── second_task.sql # SQL notebook for second job
Step 1: Configure the Base Bundle
Let’s start by examining our main databricks.yml file, which sets up the foundation of our bundle:
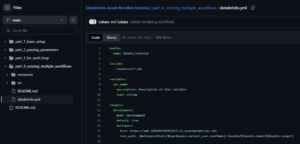
Important: Replace the https://adb-*****************.**.azuredatabricks.net placeholder with your actual Databricks workspace URL. You can find this URL in your browser’s address bar when you’re logged into your Databricks workspace.
Key points to note:
- The bundle is named bundle_tutorial
- We include all YAML files from the resources directory using include: – resources/*.yml
- We’ve defined a development target (with production commented out for future use)
- The root_path establishes where assets will be deployed in the workspace
Step 2: Define Individual Jobs
Now, let’s examine the individual job definitions that will become part of our workflow.
First Job Definition (first_job.yml)

This job defines a simple task that runs the SQL notebook located at ../src/first_task.sql.
Second Job Definition (second_job.yml)
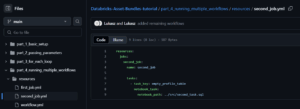
Similarly, this job runs the SQL notebook located at ../src/second_task.sql.
Step 3: Create the Task Notebooks
Let’s look at the content of our task notebooks:
First Task (first_task.sql)

This simple SQL query returns a message confirming the first task has run successfully.
Second Task (second_task.sql)

Similarly, this query confirms the second task has run successfully.
Step 4: Create the Main Workflow
The key component that brings everything together is our main workflow definition:
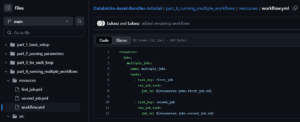
This is where the magic happens! Let’s break down what’s happening:
- We define a new job resource called multiple_jobs
- Inside this job, we define two tasks:
- first_job: Uses the run_job_task type to execute our first job
- second_job: Uses the run_job_task type to execute our second job
- The job_id parameter uses dynamic references like ${resources.jobs.first_job.id} to link to the actual job IDs of our individual jobs
The run_job_task type is specifically designed for job orchestration in Databricks, allowing one job to trigger another.
Step 5: Validate, Deploy, and Run Your Bundle
Now that we have all our components ready, we can first validate our bundle to ensure everything is properly configured before deployment:
databricks bundle validate
This validation step checks your YAML syntax and configuration references, helping you catch issues before attempting deployment. Once validation passes, we can deploy the entire bundle to our Databricks workspace:
databricks bundle deploy
This command validates all the YAML files in your bundle, uploads the notebooks to your workspace, and creates the jobs and workflow in your workspace. After successful deployment, you can trigger the main workflow using:
databricks bundle run
This command will start the multiple_jobs workflow, which will sequentially execute the first_job job (running first_task.sql) followed by the second_job job (running second_task.sql). The orchestration handles the execution order automatically based on the workflow definition.

Understanding Workflow Execution
When the main workflow runs:
- The first task (first_job) is triggered
- Once the first job completes successfully, the second task (second_job) is triggered
- When both tasks complete, the main workflow is considered finished
This creates a simple sequential orchestration, but you can build more complex dependencies by adding:
- Parallel tasks (tasks that don’t depend on each other)
- Conditional execution based on the success or failure of previous tasks
- Timeout configurations and retry policies
Monitoring and Troubleshooting
Once your workflow is running, you can monitor its progress in the Databricks UI:
- Navigate to your workspace in the Databricks UI
- Go to the Jobs section in the sidebar
- Locate your multiple_jobs workflow
- Click on it to view the execution graph and status of each task
If a task fails, the UI will show which specific job encountered an error, making it easier to troubleshoot issues in complex workflows.
Below is a quick reference table of common issues, their likely causes, and how to fix them to help you debug faster:
| Issue | Possible Cause | Solution |
|---|---|---|
| Job fails validation | YAML syntax errors or missing required fields. | Run databricks bundle validate to see detailed error messages. |
| „Job not found” error | Incorrect reference in ${resources.jobs.X.id}. | Ensure the job name matches exactly with those defined in your YAML files. |
| Notebook path not found | Incorrect relative path in notebook_task section. | Double-check that source_path matches the actual path (e.g., src/*.sql). |
Conclusion
In this final part of our Databricks Asset Bundles guide, we’ve learned how to:
- Define multiple jobs within a DAB project
- Create a main workflow that orchestrates these jobs
- Use the run_job_task type to create job dependencies
- Deploy and run a multi-job workflow
This capability allows you to build sophisticated data pipelines while maintaining the benefits of DABs, including version control, environment isolation, and simplified deployment.
By mastering the orchestration of multiple jobs within a single workflow, you now have a powerful tool for building complex, maintainable data engineering solutions on the Databricks platform.
Next Steps
Consider exploring these advanced topics to further enhance your DAB workflows:
- Parameterizing jobs to make them reusable across different datasets
- Implementing CI/CD pipelines for your DAB projects
- Adding monitoring and alerting to your workflows
- Implementing more complex execution paths with conditional logic
Happy coding with Databricks Asset Bundles!