
Databricks has become an essential platform for data scientists and engineers working with big data. If you’re new to this environment, setting up your first cluster is a crucial initial step.
In this guide, I walk you through the entire process, from understanding what Databricks is and creating your first cluster to running your first notebook.
What is Databricks?
For a comprehensive overview of Databricks and its capabilities, check out our detailed article on how Databricks transforms data intelligence with AI and open-source innovation.
Setting Up Your Databricks Workspace
Before creating a cluster, you need access to a Databricks workspace. Databricks is available on major cloud platforms including AWS, Azure, and Google Cloud. Each provider offers slightly different deployment options and integrations.
The workspace serves as your central hub for all Databricks activities, including:
- Managing clusters and computing resources
- Creating and sharing notebooks
- Organizing and accessing data
- Deploying machine learning models
- Scheduling and monitoring jobs
When selecting a cloud platform for your Databricks implementation, consider factors like existing cloud infrastructure, pricing, and specific integration requirements.
If you’re comparing options, our article on Azure Databricks vs Databricks explores key differences between these common implementations.
What Is a Cluster in Databricks?
A cluster in Databricks is a set of computing resources and configurations that power your data processing tasks. Think of it as a virtual machine or group of machines that execute the code you write in notebooks.
Types of Databricks Clusters
Databricks offers several cluster types to match different workloads:
| Cluster Type | Description | Best Use Case |
|---|---|---|
| Standard Cluster | General-purpose cluster for most workloads | Data engineering, ETL, analytics |
| High Concurrency | Shared cluster optimized for multiple users | Collaborative data science projects |
| Single Node | Runs all jobs on a single machine | Testing, development, low-volume jobs |
| Photon Cluster | Powered by Databricks Photon for faster SQL performance | Interactive SQL queries, BI workloads |
| GPU Cluster | Includes GPU hardware for acceleration | Deep learning, ML training with TensorFlow/PyTorch |
Each cluster type utilizes a specific Databricks runtime, which includes Apache Spark and other libraries optimized for the Databricks environment.
How to Create Your First Cluster (Step-By-Step)
Follow these detailed steps to create your first Databricks cluster:
1. Access Your Databricks Workspace
-
- Log in to your Databricks workspace through your cloud provider’s portal or directly via the Databricks URL.

2. Navigate to Compute Section
-
- In the left sidebar, click on “Compute” to view existing clusters and create new ones.

3. Click “Create Cluster”
-
- Look for the “Create Compute” button near the top of the page.

4. Configure Basic Settings
-
- Provide a descriptive name for your cluster (e.g., “tutorial-cluster”)
- Select the cluster mode (Multi Node, Single Node)
- Choose a Databricks Runtime version (typically, the latest stable version is recommended for beginners)

5. Set Node Configuration
-
- For a simple test cluster, you can start with the minimum worker configuration (if you are using Multi Node)
- Select appropriate instance types based on your workload requirements
- For AWS, t3.medium instances work well for initial testing
- For Azure, Standard_DS3_v2 VMs are a common starting point

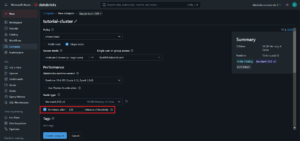
6. Configure Auto-Termination
-
- Set your cluster to terminate after a period of inactivity (e.g., 120 minutes)
- This helps control costs by shutting down unused resources
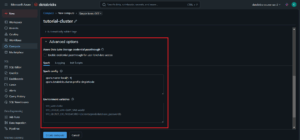
7. Add Advanced Options (Optional)
-
- Set environment variables if needed
- Configure Spark properties for performance tuning
- Add init scripts for custom initialization
8. Create the Cluster
-
- Click the “Create Cluster” button at the bottom of the page
- The cluster will begin provisioning, which typically takes 2-5 minutes

During the creation process, you’ll see the cluster status change from “Pending” to “Running” once it’s ready to use.
Cost Tip: Before finalizing your cluster setup, it’s a good idea to review the Databricks pricing to understand how your cloud provider and configuration choices may impact your costs. Databricks provides a transparent breakdown of pricing by workload, cloud, and features.
Testing Your Cluster: Run a Notebook
Once your cluster is running, it’s time to test it with a simple notebook:
1. Create a New Notebook
-
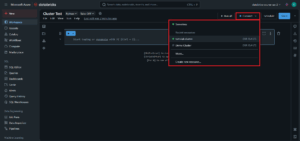
- Navigate to “Workspace” in the left sidebar
- Click the dropdown next to your workspace name and select “Create” > “Notebook”
- Give your notebook a name like “Cluster Test”
- Select the programming language (Python, SQL, R, or Scala)
- Attach the notebook to your newly created cluster
2. Run a Simple Test
-
- For a Python notebook, try running a simple code:
print(“Hello World!”)

For more complex data processing examples with Databricks, you might want to explore our guide on implementing medallion architecture in Databricks.
Tips for Beginners
To make the most of your Databricks experience while keeping costs under control:
- Always Enable Auto-Termination
- This is the single most important cost-saving feature for new users
- Set clusters to terminate after 30-60 minutes of inactivity
- Start Small, Scale When Needed
- Begin with minimal cluster configurations
- Add more workers or upgrade instance types only when you encounter performance limitations
- Use Cluster Pools for Frequent Use
- If you frequently start and stop clusters, consider using cluster pools to reduce startup times
- Leverage Community Edition for Learning
- For personal learning, Databricks Community Edition provides a free environment to practice
- Check Cluster Status Regularly
- Develop a habit of checking for running clusters and terminating those not in use
- Learn the Notebook Shortcut Keys
- Press Shift+Enter to execute the current cell
- Use Ctrl+Enter to execute without moving to the next cell

Next Steps
After successfully creating and testing your first Databricks cluster, you might want to explore:
- Data Ingestion: Learn how to bring data into Databricks from various sources.
- Advanced Notebook Features: Explore widgets, visualizations, and collaboration tools.
- Workflows in Databricks: Set up automated data pipelines and scheduled jobs. You can explore more about this in our article about Databricks workflows and practical examples.
- Unity Catalog: Understand how to manage and secure your data assets with Databricks’ governance solution. Learn more in our detailed guide on what is Unity Catalog and how it keeps your data secure.
- Databricks Asset Bundles: Explore how to package and deploy analytics projects efficiently with asset bundles. Our guide on how to use Databricks Asset Bundles in your projects can help you get started.
Get Started Today
Now that you understand the basics of creating and working with Databricks clusters, you’re ready to begin your data analytics journey. The combination of powerful distributed computing with an intuitive interface makes Databricks an excellent platform for data processing at any scale.
If you need personalized guidance or consulting services for your Databricks implementation, contact our team of experts for professional assistance.