
Data teams today face a fragmented ML toolchain – separate systems for data prep, model training, experiment tracking, and deployment. Databricks solves this by unifying the entire machine learning lifecycle on a single platform, from raw data ingestion all the way to production inference.
In this guide, I walk you through how to build ML models in Databricks end-to-end: environment setup, data preparation, model training, hyperparameter tuning, model registration, and deployment. If you are looking specifically at experiment tracking, we have a dedicated MLflow tutorial that goes deeper on that topic – this guide is the bigger picture.
Why Build ML Models in Databricks?
Databricks has become a go-to platform for machine learning teams because it eliminates the constant context-switching between tools. Everything lives in one place:
- Unified ML lifecycle – data prep, training, tracking, serving, and monitoring in a single workspace.
- Pre-configured ML runtimes – clusters come with TensorFlow, PyTorch, Keras, and scikit-learn pre-installed, with GPU support for deep learning.
- AutoML – automated feature engineering and hyperparameter tuning for rapid baselining.
- Multi-language notebooks – Python, R, Scala, and SQL in a collaborative environment.
- Unity Catalog – centralized governance covering data, features, and models in one place.
The result: your data engineers, data scientists, and ML engineers all work on the same platform, with no pipeline stitching between tools.
Prerequisites & Environment Setup
Before you begin, make sure the following are in place:
- A Databricks workspace deployed on AWS, Azure, or GCP.
- A cluster running Databricks Runtime for Machine Learning (17.3 LTS ML or above is recommended for the latest library support).
- Unity Catalog enabled in your workspace for model governance.
Once your cluster is running, configure MLflow to register models to Unity Catalog rather than the legacy workspace registry:
import mlflow
mlflow.set_registry_uri(„databricks-uc”)
# Set your target catalog and schema
CATALOG = „my_catalog”
SCHEMA = „ml_models”
Proper cluster configuration matters significantly for both cost and performance. If you want to go deeper on that, see our guide on optimizing clusters in Databricks.
| Stage | What Happens | Tools/Features in Databricks | Key Benefit |
|---|---|---|---|
| Data Preparation | Clean, transform, structure data | Spark, Delta Lake, Unity Catalog | Scalable + governed data |
| Model Training | Train ML models | scikit-learn, PyTorch, TensorFlow | Flexible framework support |
| Experiment Tracking | Log runs, metrics, models | MLflow | Easy comparison of experiments |
| Hyperparameter Tuning | Optimize model performance | Hyperopt, Optuna | Distributed parallel tuning |
| Model Registration | Store & version models | Unity Catalog | Governance + lineage |
| Deployment | Serve models to users | Model Serving, Spark UDF | Real-time + batch inference |
| Monitoring | Track performance & drift | Databricks monitoring tools | Production reliability |
Step 1 – Data Ingestion & Preparation
Good ML starts with well-structured, governed data. In Databricks, the standard approach is to load data into Spark DataFrames – either from Delta Lake tables already in your lakehouse or from external sources securely mounted via Unity Catalog Volumes.
A typical modern data preparation flow looks like this:
from pyspark.sql import functions as F
# Load from a Unity Catalog Volume (Replacing legacy DBFS /mnt/ paths)
df = spark.read.format(„delta”).load(„/Volumes/my_catalog/my_schema/my_volume/raw_table”)
# Basic preprocessing
df_clean = (df
.dropna(subset=[„target_column”])
.withColumnRenamed(„old name”, „feature_col”)
.filter(F.col(„feature_col”) > 0)
)
# Persist to Unity Catalog for governance
df_clean.write.format(„delta”).mode(„overwrite”).saveAsTable(„my_catalog.ml_models.training_data”)
Key practices at this stage:
- Persist preprocessed data to Unity Catalog – enables lineage tracking, access controls, and shareability across teams.
- Use the Databricks Feature Store for reusable, precomputed feature tables that can be shared across multiple models.
- Standardize column names early – inconsistent naming causes silent errors downstream.
Saving to Unity Catalog from the start means every downstream step – training, registration, serving – inherits governance automatically. For a detailed implementation walkthrough, see Databricks Unity Catalog implementation services.
Step 2 – Model Training
With your data prepared, the next step is selecting a training framework and running your first experiment. Databricks supports the most widely used ML frameworks out of the box:
- scikit-learn – for classic ML tasks (regression, classification, clustering).
- PyTorch / TensorFlow – for deep learning.
- Databricks AutoML – a low-code option to generate baseline models automatically.
Here is a simple scikit-learn training example wrapped in an MLflow run:
import mlflow
import mlflow.sklearn
from sklearn.ensemble import RandomForestClassifier
from sklearn.model_selection import train_test_split
from sklearn.metrics import accuracy_score
# Convert Spark DataFrame to Pandas DataFrame for scikit-learn compatibility
df_pandas = df_clean.toPandas()
# Prepare data
X = df_pandas.drop(„target”, axis=1)
y = df_pandas[„target”]
X_train, X_test, y_train, y_test = train_test_split(X, y, test_size=0.2)
# Train with MLflow autologging
mlflow.sklearn.autolog()
with mlflow.start_run():
model = RandomForestClassifier(n_estimators=100, max_depth=5)
model.fit(X_train, y_train)
preds = model.predict(X_test)
acc = accuracy_score(y_test, preds)
mlflow.log_metric(„accuracy”, acc)
Wrapping training in an mlflow.start_run() block automatically logs parameters, metrics, and the model artifact to the MLflow experiment. The Experiments UI then lets you compare runs side by side. For a deeper dive into experiment tracking and run management, see our Databricks MLflow guide.
Step 3 – Hyperparameter Tuning
Training a model with default hyperparameters rarely produces the best results. Databricks supports distributed hyperparameter optimization that runs trials in parallel across cluster workers – a significant advantage over single-machine environments.
The two most common frameworks:
- Hyperopt – Bayesian optimization over a defined search space, natively integrated with Spark for distributed trials.
- Optuna – an alternative tuning framework also supported on Databricks clusters.
A Hyperopt example:
from hyperopt import fmin, tpe, hp, Trials, STATUS_OK
def objective(params):
with mlflow.start_run(nested=True):
model = RandomForestClassifier(
n_estimators=int(params[„n_estimators”]),
max_depth=int(params[„max_depth”])
)
model.fit(X_train, y_train)
acc = accuracy_score(y_test, model.predict(X_test))
mlflow.log_metric(„accuracy”, acc)
return {„loss”: -acc, „status”: STATUS_OK}
search_space = {
„n_estimators”: hp.quniform(„n_estimators”, 50, 300, 50),
„max_depth”: hp.quniform(„max_depth”, 3, 10, 1)
}
best = fmin(fn=objective, space=search_space, algo=tpe.suggest, max_evals=20)
MLflow logs every trial automatically. You can then compare all runs in the Experiments UI and select the best-performing configuration before moving to registration.
Step 4 – Registering the Model to Unity Catalog
Once you have a trained model you are happy with, register it to Unity Catalog. This step unlocks lifecycle management, lineage tracking, and controlled access for downstream inference.
mlflow.set_registry_uri(„databricks-uc”)
model_name = f”{CATALOG}.{SCHEMA}.my_classifier”
# Register from the best run
with mlflow.start_run() as run:
mlflow.sklearn.log_model(
model,
artifact_path=”model”,
registered_model_name=model_name
)
After registration, you can:
- Set aliases such as @champion or @challenger to manage which version is in production.
- Add tags to distinguish staging from production versions.
- View full lineage – Unity Catalog records which data trained the model, who registered it, and who has access.
Unity Catalog gives you a central, auditable record of every model version across your organization. This is one of the key advantages of building inside Databricks versus assembling standalone tools.
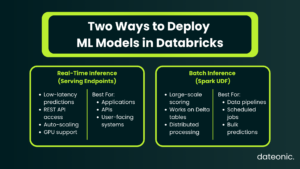
Step 5 – Deploying the Model for Inference
With the model registered, you can deploy it in two ways depending on your use case.
Real-Time Inference – Model Serving Endpoints
Use the Databricks Serving UI or API to create a custom model serving endpoint:
- Navigate to Serving in the Databricks workspace.
- Select your registered model from Unity Catalog.
- Configure compute type (CPU or GPU), scale-out size, and traffic split.
- Click Create – the endpoint becomes Ready within a few minutes.
Once live, query it via REST API:
import requests
token = dbutils.notebook.entry_point.getDbutils().notebook().getContext().apiToken().get()
url = „https://<workspace>/serving-endpoints/<endpoint-name>/invocations”
response = requests.post(
url,
headers={„Authorization”: f”Bearer {token}”},
json={„inputs”: [{„feature_col”: 1.5, „other_col”: 3}]}
)
print(response.json())
Model Serving endpoints support:
- Automatic scaling – scales up and down based on traffic.
- GPU inference – for deep learning models.
- Payload logging – for governance and audit trails.
Batch Inference – Spark UDF
For large-scale batch scoring across Delta tables, deploy the model as a Spark UDF:
from mlflow.pyfunc import spark_udf
predict_udf = mlflow.pyfunc.spark_udf(spark, model_uri=f”models:/{model_name}@champion”)
scored_df = df_clean.withColumn(„prediction”, predict_udf(*feature_cols))
scored_df.write.format(„delta”).saveAsTable(„my_catalog.ml_models.predictions”)
Monitoring & MLOps in Production
Deploying a model is not the end of the process – it is the beginning of ongoing operations. In production, you need to monitor:
- Prediction drift – are model outputs shifting over time?
- Data quality – is incoming inference data matching training data distributions?
- Model performance – is accuracy degrading as real-world conditions change?
Databricks supports automated alerting and root cause analysis for these concerns. For repeatable retraining, you can wire the entire pipeline – data ingestion through deployment – into a Databricks Workflow, creating a production-grade MLOps loop that runs on a schedule or event trigger.
This is the difference between a one-off model build and a maintainable ML system. For teams looking to optimize performance and cost across these running pipelines, see our Databricks performance tuning services.
For further reading on MLOps practices and experiment tracking within this loop, the MLflow official documentation and Databricks Machine Learning documentation are the authoritative references.
Work With Dateonic on Your Databricks ML Platform
Building ML models in Databricks involves many moving parts – getting each layer right, from Unity Catalog governance and cluster configuration to end-to-end MLOps pipelines, is where most teams lose significant time and budget.
Dateonic is an official Databricks consulting partner with a team of certified data engineers specializing in AI-ready data platforms. We help businesses implement, optimize, and scale Databricks environments – from initial setup through production ML operations.
Whether you are starting from scratch or untangling an existing setup, we can help you build a platform that your ML team can actually move fast on.
Looking to build production-ready ML models on Databricks? Contact Dateonic for a free consultation.
Conclusion
Building ML models in Databricks follows a clear five-step process: prepare your data in Delta Lake and Unity Catalog, train your model using scikit-learn, PyTorch, or AutoML, tune hyperparameters with distributed tools like Hyperopt, register the best model to Unity Catalog, and deploy via Model Serving or Spark UDF for batch inference.
The real value of Databricks is that all of these steps happen on one platform, with shared governance, lineage, and compute. There is no glue code, no pipeline fragility between separate tools, and no re-authentication between systems. That is what makes building ML models in Databricks the right choice for production-grade ML at scale.