
Running a solo notebook is easy. Managing a shared data engineering project – with multiple contributors, overlapping changes, and no version history – is a different challenge altogether. That is where Git integration becomes non-negotiable.
Knowing how to use Git with Databricks notebooks is one of the foundational skills that separates experimental, ad-hoc analytics from production-grade data engineering. This guide walks through everything you need: connecting your Git provider, creating Git Folders, committing and pushing changes daily, managing branches, and setting up CI/CD pipelines that deploy code automatically. Whether you are onboarding a new team or formalizing an existing workflow, this is the standard setup.
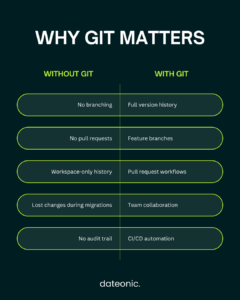
Why Git Integration Matters for Databricks Notebooks
Databricks includes built-in revision history for notebooks, but it has meaningful limitations:
- Workspace-bound – history exists only within your workspace instance
- No branching – you cannot work on features in isolation
- Non-collaborative – no code review, no pull request process
- Fragile – history is lost if the workspace is deleted or migrated
Connecting Databricks to a Git provider solves all of this. You get the full power of version control: named commits, branches, diffs, pull requests, and an audit trail that lives outside the platform.
For teams, it also eliminates one of the most common pain points – code that only lives in one person’s personal workspace, invisible to colleagues and undeployable to production. If you are working through any of the common Databricks implementation challenges, lack of version control is consistently among the first issues to address.
Important note: Databricks removed the legacy per-notebook Git integration on January 31, 2024. The current standard is Git Folders (formerly “Repos”). All steps in this guide reflect that approach.
Supported Git Providers
Git Folders works with all major providers. The setup steps and day-to-day workflow are the same regardless of which one your team uses:
- GitHub
- GitLab
- Bitbucket Cloud and Bitbucket Server
- Azure DevOps
- AWS CodeCommit
- Gitea and other self-hosted options
All providers require authentication via a Personal Access Token (PAT) – not a password. Tokens are scoped, time-limited, and far more secure than credential-based access.
Step 1 – Connect Your Git Provider to Databricks
Before creating any Git Folders, you need to link your Git account to your Databricks workspace. This is a one-time setup per user. Navigate to your account settings and connect your provider:
- Go to Settings → Linked Accounts → Git Integration
- Select your Git provider from the dropdown (e.g., GitHub)
- Enter your Git username
- Paste your Personal Access Token
- Click Save
Generating a GitHub PAT: In GitHub, go to Settings → Developer Settings → Personal Access Tokens → Fine-grained tokens. Grant read and write access to code/repository contents and workflows. Fine-grained tokens are highly recommended over classic tokens for enhanced security. For GitHub’s full PAT documentation, refer to the official guide.
⚠️ Token expiry: If your token expires, the Git connection breaks silently. Set a calendar reminder to rotate tokens before they expire – this is a common source of unexpected pipeline failures.
Step 2 – Create a Git Folder
With your provider connected, you can now clone a repository into your Databricks workspace as a Git Folder. Every notebook inside a Git Folder is tracked by Git automatically.
Steps to create a Git Folder:
- Navigate to Workspace → Users → [your username]
- Click Create → Git Folder
- Paste your repository’s HTTPS clone URL (e.g., https://github.com/your-org/your-repo.git)
- Confirm the Git provider and folder name
- Click Create Git Folder
The repository now appears in your workspace tree. You can browse directories, open notebooks, and edit them exactly as you would any other Databricks notebook – with one key difference: every change you make is now trackable, committable, and pushable to remote.
What lives inside a Git Folder:
- Python notebooks (.py)
- SQL notebooks (.sql)
- Scala and R notebooks
- Supporting files: configs, YAML, markdown documentation
- Delta Live Tables pipeline definitions
Step 3 – Daily Workflow: Commit, Push & Pull
Once your Git Folder is set up, the day-to-day Git workflow happens directly from the notebook interface. There is no need to leave Databricks for routine version control operations.
Creating a Branch
Always work on a branch, never directly on main. At the top of any notebook inside a Git Folder, click the branch icon and select Create Branch. Give it a meaningful name – feature/ingest-pipeline, fix/schema-mismatch, and so on.
Making and Committing Changes
Edit your notebook as normal. When you are ready to save a logical unit of work:
- Click the branch icon at the top of the notebook
- Open the Changes tab to review the diff
- Write a clear, descriptive commit message
- Click Commit
Note: Committing via the Databricks UI automatically strips output cells from notebooks. This prevents accidental exposure of data or query results in your repository – a meaningful security and compliance benefit.
Pushing and Pulling
- Push – sends your committed changes to the remote repository (GitHub, GitLab, etc.)
- Pull – syncs the latest remote changes into your local Git Folder
Pull regularly, especially before starting new work. This keeps your branch current and reduces merge conflicts.
Step 4 – Branching Strategy and Pull Requests
A consistent branching strategy is what separates a working team from a chaotic one. The recommended approach for most Databricks teams:
- One branch per feature, notebook, or fix – keeps changes isolated and reviewable
- Short-lived branches – merge frequently rather than building up large diffs
- Protected main branch – no direct commits; all changes go through pull requests
Branch operations in Databricks:
- Create and switch branches directly in the notebook UI
- Pull with rebase is supported inside Databricks – useful for keeping feature branches current with main without creating merge commits
Pull requests and merges happen in your Git provider’s interface (GitHub, GitLab, etc.), not inside Databricks. This is intentional – it keeps code review tooling in the platform built for it, while keeping notebook editing in Databricks.
For teams managing complex governance requirements alongside version control, pairing Git Folders with Databricks Unity Catalog creates a complete governance layer – access control, data lineage, and code auditability all in one stack.
Step 5 – CI/CD Integration
Git integration is valuable on its own, but its full power comes when you connect it to automated pipelines. CI/CD turns your repository into a deployment system.
Common automation patterns:
- On pull request open – run notebook tests, validate schemas, lint code
- On merge to main – deploy notebooks to production workspace automatically
- On schedule – run regression tests against staging data
Tools that work well with Databricks Git Folders:
- GitHub Actions – native YAML-based workflows, tight GitHub integration
- Azure DevOps Pipelines – preferred for teams on Azure Databricks
- Databricks CLI – programmatic Git operations, workspace management
- Databricks Asset Bundles (DABs) – infrastructure-as-code for pipelines, jobs, and cluster configs
For a deeper look at the infrastructure side of this, Dateonic’s guide on end-to-end Databricks enablement covers how Git, CI/CD, and platform governance fit together at scale. For the official Databricks reference on Git Folders and CI/CD integration, see Databricks Git Folders documentation.
Best Practices
Following these practices from the start prevents the technical debt that accumulates when teams skip version control discipline.
Workspace Hygiene
- Always work inside a Git Folder – personal workspace notebooks are invisible to the team and undeployable
- Never commit directly to main – use branches and pull requests
- Commit frequently with meaningful messages; avoid large, vague commits
Security
- Rotate Personal Access Tokens on a schedule – expired tokens cause silent failures
- Store PATs in workspace secrets, not hardcoded in notebooks
- Review token permissions regularly – use the minimum scopes required
Governance
- Combine Git Folders with Unity Catalog implementation for full data and code governance
- Use pull request templates to enforce review checklists
- Tag releases in Git when deploying to production
Performance and Cost
- Large output cells in notebooks slow down diffs and inflate repository size – Databricks strips these on commit, but clean up notebooks periodically
- For resource optimization alongside engineering practices, see how to reduce DBU consumption in Databricks
Summary
Here is the full workflow at a glance:
| Step | Action | Where |
|---|---|---|
| 1 | Connect Git provider with PAT | Databricks Settings |
| 2 | Clone repo as Git Folder | Databricks Workspace |
| 3 | Create feature branch | Notebook branch icon |
| 4 | Edit, commit, push | Notebook UI |
| 5 | Open PR and merge | GitHub / GitLab / Azure DevOps |
| 6 | Automate tests and deploys | GitHub Actions / Azure DevOps |
Conclusion
Using Git with Databricks notebooks is not an advanced feature – it is the baseline for any team doing serious data engineering. Git Folders give you full version history, branching, code review, and CI/CD integration, all without leaving the Databricks environment for day-to-day work.
The steps above cover the full journey from initial setup to automated deployments. Once this foundation is in place, your team can ship data pipelines with the same confidence and auditability as software engineering teams.
Setting up Git integration is just one piece of building a production-ready Databricks platform. Dateonic – an official Databricks implementation partner – helps data teams architect, implement, and scale the full platform the right way. Contact Dateonic to get expert guidance on your Databricks environment.