
Azure Databricks is a unified analytics platform built on Apache Spark and tightly integrated with the Microsoft cloud ecosystem. It provides a collaborative environment for data engineers and data scientists to run large-scale data processing and machine learning workloads.
Correctly configuring the platform is the first and most critical step for ensuring performance, security, and cost management.
In this definitive technical guide, I provide a step-by-step walkthrough to help you set up Databricks Azure workspaces from scratch. We will cover the essential prerequisites, the core deployment process, and the initial configurations needed to get your environment running successfully.
Prerequisites for Setting Up Databricks in Azure
Before you create your first workspace, you must have a few key components in place. Proper preparation prevents permission-related errors and ensures you can select the right configuration for your needs.
- Active Azure Subscription: You must have a valid Azure subscription. This can be a free trial, a Pay-As-You-Go plan, or an enterprise agreement.
- Sufficient Permissions: Your Azure account must have, at a minimum, the Contributor role on the subscription (or on the specific resource group) to create a new Databricks workspace. The Owner role is also sufficient.
- Azure Portal Familiarity: This guide assumes you have a basic understanding of how to navigate the Azure Portal to create resources and resource groups.
- Optional – VNet: If your security policies require that cluster nodes have no public IP addresses, you may need a pre-configured Azure Virtual Network (VNet) for VNet injection.
A critical prerequisite is understanding the pricing model. You choose a tier when creating the workspace, which impacts both cost and available features. As you review your options, it’s wise to consider a long-term plan for Databricks cost optimization.
Azure Databricks Pricing Tiers
| Feature | Trial | Standard (Legacy) | Premium |
|---|---|---|---|
| Best For | Free 14-day trial | Basic Apache Spark workloads | All workloads, esp. enterprise |
| Core Features | All Premium features | Apache Spark, Delta Lake, MLflow | All Standard features |
| Security | N/A | Basic | Role-Based Access Control (RBAC) |
| Governance | N/A | Basic | Audit logging, Unity Catalog |
| High Concurrency | Yes | No | Yes (Optimized clusters) |
| Compliance | No | No | HIPAA, PCI-DSS (with add-on) |
Note: As of this writing, Microsoft has announced the retirement of the Standard tier, with all workspaces migrating to the Premium tier. New workspaces should be created on the Premium tier to access the full range of features, especially Unity Catalog. For the most current details, see the official Azure Databricks pricing page.
Step-by-Step Guide to Set Up Databricks in Azure
Follow these steps to deploy your workspace directly from the Azure Portal.
Step 1: Log In to the Azure Portal
Access the Azure Portal and sign in with your Microsoft Entra ID (formerly Azure Active Directory) credentials.
Step 2: Create a New Azure Databricks Workspace
From the Azure Portal homepage or the main menu, click Create a resource. In the Azure Marketplace search bar, type „Azure Databricks” and select it from the results. Click Create.
Step 3: Configure Workspace Basics
You will be directed to the „Create an Azure Databricks workspace” configuration screen. Fill in the „Basics” tab:
- Subscription: Choose the Azure subscription where the workspace will be billed.
- Resource group: Select an existing resource group or click „Create new” to make a new one. This group will hold your Databricks workspace and its associated managed resource group.
- Workspace name: Enter a unique name for your workspace (e.g., databricks-prod-analytics).
- Region: Select the Azure region where you want to deploy your workspace. Choose a region close to your data sources (like Azure Storage) to minimize latency.
- Pricing Tier: Select your tier. Premium is recommended for all new production workloads to access advanced security, governance, and features like Unity Catalog.
Step 4: Set Up Networking Options
On the „Networking” tab, you decide how your workspace interacts with your network.
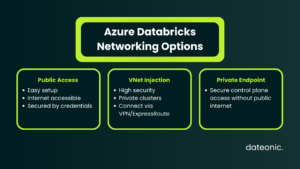
- Default (Public Access): The easiest setup. The workspace control plane and data plane are accessible from the public internet, secured by credentials and security rules.
- VNet Injection (Secure Cluster Connectivity): This advanced option deploys your Databricks clusters inside your own Virtual Network (VNet). This is the standard for high-security environments, allowing you to:
- Use custom network security groups (NSGs) to control traffic.
- Connect to on-premises data sources via ExpressRoute or VPN.
- Eliminate public IP addresses for your clusters.
- Public/Private Access: You can also configure private endpoints (using Azure Private Link) to securely connect to your workspace control plane without using the public internet.
Step 5: Add Tags and Review Settings
On the „Tags” tab, you can apply name/value pairs for resource management and cost tracking. This is a best practice for managing Azure resources.
Move to the Review + create tab. Azure will validate all your configuration settings. Once validation passes, review your choices and click Create. The deployment process typically takes 5 to 10 minutes.
Step 6: Launch the Databricks Workspace
Once deployment is complete, a „Your deployment is complete” message will appear. Click Go to resource to open your new Azure Databricks workspace overview page.
From the overview page, click the Launch Workspace button. This will open the Azure Databricks web interface in a new tab and automatically sign you in.
Step 7: Initial Configurations and Best Practices
Your workspace is running, but you should perform a few initial steps:
- Create a Cluster: In the Databricks UI, go to the „Compute” tab and create your first cluster. This is the Spark engine that will run your notebooks and jobs.
- Create a Test Notebook: Go to the „Workspace” tab, create a new notebook, attach it to your running cluster, and run a simple command (e.g., spark.range(10).show()) to verify everything works.
- Integrate Storage: Connect your workspace to Azure Blob Storage or Azure Data Lake Storage (ADLS) Gen2.
- Set Up Security: In the Admin Console, configure IP access lists to restrict workspace access to your corporate IP ranges.
- Explore Architecture: Start planning your data architecture. A best practice is to follow the Medallion Architecture (Bronze, Silver, Gold tables) to progressively refine your data.
For a deeper dive into the specifics of the Azure integration, see this guide on Azure Databricks vs. Databricks.
Common Troubleshooting Tips
Occasionally, you may run into issues during deployment. Here are a few common problems:
- Insufficient Permissions: If deployment fails with an „authorization” error, it usually means your account lacks the Contributor or Owner role on the subscription or resource group.
- Deployment Failures: A „resource provider” error may mean the Microsoft.Databricks resource provider is not registered for your subscription. You can manually register it in your subscription’s „Resource providers” settings.
- VNet Issues: If you used VNet injection and it fails, double-check that your subnet ranges are large enough and that your user-defined routes (UDRs) or NSGs are not blocking traffic.
For more complex issues, the official Microsoft troubleshooting documentation is the best resource.
Conclusion
You have now successfully set up Databricks in Azure. By creating a workspace, you have laid the foundation for a scalable and collaborative data platform. You are ready to start building data pipelines, training machine learning models, and running interactive queries on massive datasets.
From here, we encourage you to explore advanced features like Delta Lake for data reliability, MLflow for managing the machine learning lifecycle, and Unity Catalog for unified governance. For a strategic comparison of platforms, you might also find this Databricks vs. Snowflake comparison useful.
For expert assistance with your Azure Databricks implementation or for building custom data and AI solutions, contact Dateonic to accelerate your cloud journey.