
Getting data from its raw, messy source into a clean, reliable state for analysis is the core challenge of data engineering. The proven method for this is an ETL (Extract, Transform, Load) process – the engine that collects, refines, and stores your data.
If you’re new to this world, trying to build an ETL pipeline in Databricks is an excellent starting point. Databricks puts the essential tools, like the processing power of Apache Spark and the reliable storage of Delta Lake, into a single workspace.
This Databricks ETL tutorial is designed specifically for beginners. We’ll give you a simple, practical walkthrough of every step, from connecting to your raw files to automating your first pipeline.
Prerequisites
Before we begin, you’ll need a few things in place. The goal is to get your environment ready so you can focus on building the pipeline.
- A Databricks Account: You’ll need an active Databricks subscription and a workspace.
- Basic Skills: A foundational knowledge of Python or SQL is necessary, as these are the primary languages used in Databricks notebooks.
- Sample Data: Have some sample data (like CSV or JSON files) ready in a cloud storage location, such as Amazon S3, Azure Blob Storage, or Google Cloud Storage.
- A Compute Cluster: All computations in Databricks run on a cluster. You must set one up before you can run any code.
To create a cluster, simply navigate to the „Compute” section in your Databricks workspace sidebar and click „Create Cluster.” For this beginner tutorial, you can start with a „Single Node” cluster. This is the simplest and most cost-effective option for learning.
Most importantly, set an „Auto-Termination” (e.g., 30 minutes) to ensure the cluster shuts down when idle, saving costs. For a more detailed walkthrough, you can check out this guide on getting started with Databricks clusters.
Step 1: Setting Up Your Databricks Environment
With your cluster running, your first step is to create a notebook. This is the interactive environment where you’ll write and execute your code.
- In the Databricks sidebar, navigate to your „Workspace.”
- Click „Create” and select „Notebook.”
- Give your notebook a name (e.g., „my-first-etl-pipeline”) and select the language (Python or SQL) you’re comfortable with.
- Attach your notebook to the cluster you created in the prerequisites.
Before you ingest data, it’s wise to set up your data governance structure using Unity Catalog. Unity Catalog provides a unified governance model for all your data assets. It uses a three-level namespace: catalog.schema.table. For this exercise, you can create a new catalog and schema (which is like a database) to hold your new tables.
Step 2: Extracting Data
Now, let’s pull in your raw data. Instead of a manual one-time read, the best practice is to use Auto Loader. Auto Loader incrementally and efficiently processes new data files as they land in your cloud storage. This saves you from having to track which files you’ve already processed.
| Feature | Auto Loader | Manual Reads |
|---|---|---|
| New File Detection | ✔ Automatic | ✖ Manual tracking |
| Schema Evolution | ✔ Built-in | ✖ Breaks pipeline |
| Scale to Millions of Files | ✔ Yes | ✖ Not recommended |
| Streaming Support | ✔ Native | ✖ Needs extra logic |
| Ease of Use | Very simple | Higher maintenance |
Auto Loader is built on Spark Structured Streaming. You can configure it to monitor a specific directory for new files.
- It can automatically infer your data’s schema (the column names and types).
- It can also handle schema evolution, so if new columns are added to your files later, your pipeline won’t break.
- A known limitation is that automatic inference can sometimes misidentify data types. For production-ready pipelines, it’s best to define your schema explicitly.
Here is a basic Python example of how to set up a streaming read using Auto Loader on a folder of JSON files:
# Define the path to your source data in cloud storage
source_path = „/path/to/your/raw/json/files/”
# Define where to store schema information
schema_location = „/path/to/your/schema/location/”
# Configure the Auto Loader stream
raw_df = (spark.readStream
.format(„cloudFiles”)
.option(„cloudFiles.format”, „json”)
.option(„cloudFiles.schemaLocation”, schema_location)
.load(source_path)
)
Step 3: Transforming Data
With your raw data being streamed into the raw_df DataFrame, it’s time for the „Transform” step. This is where you clean, shape, and enrich the data to make it useful. This process is often aligned with the „Silver” layer of a Medallion Architecture, where data is conformed and queried.
Using standard Spark DataFrame operations, you can perform any number of transformations:
- Filtering: Remove rows that don’t meet your criteria (e.g., filter(„order_total > 0”)).
- Selecting/Renaming: Choose the columns you need and give them clear names (e.g., withColumnRenamed(„ts”, „event_timestamp”)).
- Handling Nulls: Fill in missing values using .fillna().
- Applying Business Logic: Create new columns based on existing data (e.g., calculating a tax or a new category).
- Joining: Enrich your data by joining it with another dataset, like a customer lookup table.
You can also implement data quality checks using expectations to ensure your data is valid before it moves to the next stage.
# Apply basic transformations
transformed_df = (raw_df
.withColumnRenamed(„id”, „customer_id”)
.withColumn(„ingestion_date”, current_timestamp())
.filter(„customer_id IS NOT NULL”)
)
Step 4: Loading Data
Finally, you’ll load your transformed data into its destination. The recommended format in Databricks is Delta Lake.
Writing your data to a Delta Lake table provides massive benefits. Delta Lake is an open-source format that solves common data lake challenges by bringing reliability and ACID (Atomicity, Consistency, Isolation, Durability) transactions to your data. This prevents data corruption and improves query performance.
Since we started with a readStream, we will use a writeStream to load the data into a new Delta table. This table will be automatically registered in the Unity Catalog schema you set up in Step 1.
# Define the name of your target Delta table
table_name = „your_catalog.your_schema.cleaned_customers”
# Define where to store checkpoint information for the stream
checkpoint_location = „/path/to/your/checkpoint/location/”
# Write the transformed data to a Delta table
(transformed_df.writeStream
.format(„delta”)
.outputMode(„append”)
.option(„checkpointLocation”, checkpoint_location)
.toTable(table_name)
)
Your streaming pipeline is now active! As new files land in the source folder, this notebook will automatically process and append them to your cleaned_customers table.
Step 5: Automating and Scheduling Your Pipeline
A notebook is perfect for interactive development, but for a production pipeline, you need to automate it. In Databricks, you do this using Databricks Jobs.
A Databricks Job can be configured to run your notebook on a schedule (e.g., once per hour) or as a continuous, always-on job for real-time streaming.
- In the sidebar, navigate to „Workflows” (this is the new name for „Jobs”).
- Click „Create Job” and give it a name.
- For the „Task,” select your notebook.
- Choose the cluster you want the job to run on. You can configure a new „Job Cluster” that is created specifically for this run, which is a cost-effective best practice.
- Set a „Trigger” to schedule your job. You can set it to run on a fixed schedule (e.g., daily) or set it to „Continuous” if you have a streaming workload.
This separates your development environment from your production automation, ensuring your pipeline runs reliably.
Best Practices for ETL Pipelines in Databricks
As you move beyond your first pipeline, keep these best practices in mind:
- Use Delta Live Tables (DLT): For more complex pipelines, consider using Delta Live Tables (DLT). DLT is a declarative framework that simplifies building reliable and maintainable pipelines. You define the data transformations, and DLT handles the orchestration, data quality, and error handling for you.
- Optimize Performance: As your data grows, leverage Delta Lake features like data skipping and caching to speed up queries. Partitioning your data (e.g., by date) can also dramatically improve performance.
- Ensure Governance: Always use Unity Catalog to manage access, audit data, and track lineage. This is essential for security and compliance.
Conclusion
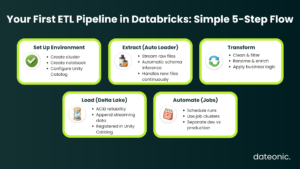
Congratulations! You’ve just walked through the fundamental steps to build an ETL pipeline in Databricks. You learned how to set up your environment, extract data with Auto Loader, transform it with Spark DataFrames, load it into a reliable Delta Lake table, and automate the process with Databricks Jobs.
This is the starting point of your Databricks journey. As your data challenges grow in complexity, so will your pipelines.
For expert guidance on scaling your Databricks projects and building enterprise-grade data + AI solutions, reach out to Dateonic.